Windows Server 2012 and Internet Explorer 10

Feeling stressed lately, giving up, downloading Chrome on Windows Server 2012 to download tools in your Windows Server 2012 lab environment?
I know how you feel, it’s a bit frustrating when you try to download files in Internet Explorer, you add the page to trusted websites, lower the security levels for the internet zone, turn off protected mode and still you are presented by The big white

Caution: When downloading files from Internet Explorer you need to ask yourself – what am I downloading and Why, am I only installing Chrome because I want to download Acrobat Reader, why am I installing Acrobat Reader on A SERVER?

The Solution is Knowledge!

If Internet Explorer Enchanced Security is Enabled – File downloads from the Internet Zone is turned off.

But for Lab/Testing/Iwillnotusethisinproduction you can turn off Internet Explorer Enchanded Security:
Open Server Manager, go to Dashboard, click Configure this local server, and in the properties section next to IE Enhanced Security Configuration click the ON and select OFF.
If you want to read more about enchanced security features in Windows Server 2012 and IE visit this webpage and read it.
BUT if you follow the instructions on the mentioned page and open IEs default page to find out more about Internet Explorer Enhanced Security Configuration by clicking the link, you will most likely be presented with “This page can’t be displayed”.
Solution: Note the url res://ieframe.dll/IESecHelp.htm – if you change it to iesetup instead of ieframe.dll…etc you will access the correct help page.

How to make users ask for permission to access folders the Windows 8/Server 2012 way

-“I can’t access this folder”
-“What’s the name of the folder you are trying to access”?
-“I don’t know… G something”
-“…Ok… can you tell me the name of  a colleague who’s got access to the folder”?
-“Yes! There’s Peter, but I don’t know his last name”
And thus the interrogation continues…

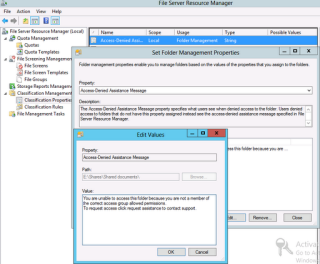
But wait! With Windows 8 and Server 2012 we configure Access Denied Assistance Message and let the user click a button to provide us with the information we need when managing access to folders.
How neat isn’t this:

The configured message on the Windows 8 Client
What the mail function looks like on the client

 So basically, the user can request permission, you have configured a folder owner e-mail adress, what information the mail will contain (such as folder path etc) for a shared folder, and voila, no communication needed from either side 🙂

Where to configure Request Assistance message for a share

The customized message specified for a share

And of course you can configure this with Group Policy to apply if for all files and folders.
Computer configuration\Policies\Administrative Templates\System\Access-Denied Assistance 


Anyway, there are a LOT of more (and I dare say it) awesome features that makes it easier for both the user and the administrator when it comes to file and resource management, but that’s another day and another blog post. 🙂

Adding or removing features with Powershell (or Dism)

Installing or uninstalling, waiting for updates, re-starting, staring at that “please-waaaaiiiit-wheel” can make you feel like… you’re wasting your time.
What if you want to install a feature with a script, or manually/graphically adding one doesn’t work – you start over, you restart the machine, go back to add/remove features and realize that – well – it didn’t install the rest of the management features… *sigh* instead of waiting… clicking Next… Filling out forms… Restarting… and so on bla bla.

So! We’ll look at different ways to add, install or uninstall features in Windows 8 and Windows Server 2012:

Uninstalling or Installing Windows Features using Poweshell
Run Powershell as Administrator and execute the following:
Get-WindowsFeature
to view a list of Available and Installed Features

If you want to remove a Windows feature such as the Graphical user interface on Windows Server 2012 (GUI) and run core you can uninstall Graphical Management Tools and Infrastructure (Server-Gui-Mgmt-Infra) and Server Graphical Shelll (Server-Gui-Shell) you can run the following command to uninstall the windows features
Uninstall-WindowsFeature Server-Gui-Mgmt-Infra,Server-Gui-Shell -Restart

So if you want to Install a windows feature you simply run Install instead:
Install-WindowsFeature Server-Gui-Mgmt-Infra,Server-Gui-Shell -Restart

Uninstalling or Installing Windows Features using DISM
Run CMD as administrator and execute the following
dism /online /get-features | more
To install a feature using dism, for example .Net 3.5, .Net2.0 for older applications use
dism /online /enable-feature /featurename:NetFx3

Getting errors, or how to install features that are missing installation files using an ISO
Did you install a Core server and can’t get the windows feature for GUI to install? Grab a Windows Server 2012 (or Windows 8 ISO if you’re trying to install .net on a client) and use install.wim to get a hold of the c:\windows\winsxs folder which has all the nessecary files to install a windows feature.

With Powershell
1. Mount the ISO and create a folder called C:\mount. Mount a Server 2012 or Windows 8 ISO depending on your working environment and note the drive letter, in this example I will use D:\, by running the following:
Mount-Diskimage C:\Lab\windows8orserver2012.iso
2. Determine what Index number you will use (Datacenter or Enterprise etc) by running the following command:
Get-WindowsImage -ImagePath D:\sources\install.wim
3. Mount the install.wim from the ISO by running the following commandline:
Mount-WindowsImage -ImagePath D:\sources\install.wim -Index 4 -Path C:\mount -Optimize -ReadOnly
4. Install the feature using the winsxs folder from your mounted install.wim image by running the following commandline:
Install-WindowsFeature Server-Gui-Mgmt-Infra,Server-Gui-Shell –Restart
–Source c:\mountwim\windows\winsxs
5. To dismount the wimfile run
Dismount-WindowsImage -Path C:\mount -Discard Dismount-WindowsImage -Path C:\mount -Discard

If you need to create a folder you can use New-Item cmdlet to create a folder:
New-Item c:\ Mount -type directory


With Dism
1. Mount the ISO and note the drive letter and create a folder called C:\Mount, in this example I will use D:\
2. Determine what Index number you will use (Datacenter or Enterprise etc) by running the following command:
Dism /get-wiminfo /wimfile:D:sources\install.wim
3. Mount the install.wim file (in this example the Index number is 4) by running the following commandline:
Dism /mount-wim /WimFile:D:\sources\install.wim /Index:4 /MountDir:c:\mount /readonly
4. Install the windows feature by running the following
dism /online /enable-feature /featurename:servercore-fullserver /featurename:server-gui-shell /featurename:server-gui-mgmt /all /source:N:\sources\sxs

If you need to create a folder use mkdir.

Get help with Powershell -examples


Sitting at Mikael Nyströms Windows Server 2012 lab I yet again realize that it’s never too late to get help… when it comes to powershell 🙂
I’m not a Powershell Guru (…yet,but to be Jedi I want) and until that day emerges I need to Get-Help, so Powershell help to the rescue!

Searching for help with Powershell ISE
Powershell ISE is useful for building, debugging, testing scripts and copy-pasting instead of using Powershell and Notepad. Other than that I find it useful when getting help.
Run Powershell ISE and open Commands by either running Show-Command or click Show Command Window.
ï»ż

Show Command Window

Type in New-virtual and select the New-VirtualDisk cmdlet, click the field next to FriendlyName* and click F1 to bring up Help and notice that you can use the Search field to find cmdlets etc.

Getting help and detailed examples
Type Get-Help get- and notice the snippet window with examples that you can run, type get-v and use TAB to complete the command Get-Help Get-VirtualDisk and hit Enter.

Snippets


If you get promted to update help select Yes and use the Up Arrow key to re-select the latest command Get-Help Get-VirtualDisk.
At the end of the page under Remarks note that you can view examples, detailed, full and -Online.
If you type Get-Help Get-VirtualDisk -Online (Unfortunately some cmdlets are not yet present in the help file)

And there are a lot of other ways to get help, if you haven’t visited The Scripting Guys blog -do, or if you’re Swedish, you can download the free e-book “Kom igĂ„ng med Powershell” from Niklas Goudes site and my favorite page (one of many) is a list of Powershell cmdlets at Technet

Windows 8 RTM is here! If you don’t want to upgrade but want to try it out, dualboot with VHD!

If you want to try out Windows 8 but don’t feel like letting go of Windows 7 until you’ve figured out where the Startmenu went, a local dualboot environment can ease your mind.

Before we start – you know when you were a kid and you wanted to be a magician and do cool stuff to impress people but was too lazy to learn magic tricks? (Maybe it’s just me..)
Now, as an adult, I think powershell can have that effect, and for us IT-administrators who think that Windows 8 is too flashy, well… There are a lot of awesome cmdlets out there in Windows 8 (and Server 2012) and I mean this in a really good and comforting way.

So off we go!
Get your Windows 8 RTM 90 day trial
Scroll down on the page and sign in with your Windows Live ID

Download a Powershell install-windowsimage.ps1 script
To apply the installation files from the Windows 8 RTM ISO

And since you’ll be doing this from a Windows 7 client you’ll be needing an ISO application such as PowerIso or other (But hey, in Windows 8 there’s already built-in support for that)

1. Run cmd as administrator and enter the following

·        diskpart

·        create vdisk file=c:\w8\w8.vhd maximum=20000 type=expandable

·        select vdisk file=c:\w8\w8.vhd

·        attach vdisk

·        create partition primary

·        active

·        format fs=ntfs quick

·        assign letter=Z

·        exit

2. Mount the Windows 8 RTM ISO and note the drive letter

3. Run Powershell as Administrator and run the following command:Set-ExecutionPolicy Remotesigned (and answer Y)

4. In Powershell navigate to the directory where your install-windowsimage.ps1 file is located by using cd or other commands and run the following command from powershell
.\Install-WindowsImage.ps1 –WIM F:\Sources\Install.wim –Apply –Index 1 –Destination Z:\

(Where F is the drive letter of the mounted ISO and Z:\ is the destination of my mounted VHD)

5. When the install.wim is applied and ready you run the following command from an elevated cmd
bcdboot.exe Z:\Windows

And done!

Now restart, log on to your Windows 8 machine and… Why not run Hyper-V in Windows 8?

Disable flash in Internet Explorer 10 / Inaktivera Flash i Internet Explorer 10

With Group policy you can disable Flash in Internet Explorer 10 by enabling the Group Policy “Turn off Adobe Flash in Internet Explorer and prevent applications from using Internet Explorer technology to instantiate Flash objects” located at User Configuration\Administrative Templates\Windows Components\Internet Explorer\Security Features\Add-on management

There are a few more great policies here such as Add-on List.
If you go to Internet Explorer, Tools and manage add-ons you can right click an add-on, choose properties and with the CSLID specified for the add-on Control which add-ons to run (1) or disable (0)
Then you can enable the policy “Deny all add-ons unless specifically allowed in the Add-on list”
Internet Explorer 10 FAQ

Med Group policy so kan du inaktivera Flash i Internet Explorer 10 genom Group policyn “Turn off Adobe Flash in Internet Explorer and prevent applications from using Internet Explorer technology to instantiate Flash objects” som finns via User Configuration\Administrative Templates\Windows Components\Internet Explorer\Security Features\Add-on management

Det finns fler anvÀndbara policies hÀr som möjligheten att begrÀnsa add-ons.
Man öppnar Internet Explorer, verktyg och sedan vÀljer du Hantera tillÀgg.
DÀr högerklickar du pÄ ett tillÀgg och noterar CSLID för detta.
Sedan anvÀnder du den informationen i Add-on list GPO:n och antingen tillÄter (1) eller inaktiverar det (0).
Sedan kan du aktivera policyn “Deny all add-ons unless specifically allowed in the Add-on list”
Internet Explorer 10 FAQ

Windows 8 shortcut keys / Windows 8 kortkommandon

UPDATED:
And then Microsoft said let there be and URL with Windows 8 shortcut keys
http://windowsteamblog.com/windows/b/windowsexperience/p/win8_keyboard_shortcuts.aspx

Old: The pdf file with Windows 8 shortcut keys makes me nervous so I tried to make a better one with more pages so you don’t have to zoom in like there’s no tomorrow to actually see what kind of shortcut keys there are. The pdf contains new and old shortcut keys. You can download it here
And I’m sorry for my horrible pdf/excel skills 😉

UPPDATERAD:
HÀr hittar du en URL med alla kortkommandon för Windows 8:
http://windowsteamblog.com/windows/b/windowsexperience/p/win8_keyboard_shortcuts.aspx

Gammal: Jag tyckte inte att pdf filen med Windows 8 kortkommandon var speciellt anvĂ€ndbar dĂ„ man fĂ„r zooma in hela tiden för att se exakt vad som stĂ„r i dokumentet sĂ„ jag gjorde en ny pdf med fler antal sidor sĂ„ att man kan se vilka kommandon som finns. Det Ă€r en del nya kortkommandon men mĂ„nga finns kvar sedan Windows 7. HĂ€r kan du hĂ€mta hem filen.
Och jag ber om ursĂ€kt för att den inte Ă€r den snyggaste pdf jag skapat hittills 😉

Powershell 3.0 i Windows 7

Om du inte har satt dig in i Powershell Ă€nnu sĂ„ Ă€r det hög tid att göra detta. Det finns en bok i pdf format som Ă€r helt gratis att hĂ€mta hem (Niklas Goude) och nu med Powershell 3.0 sĂ„ kommer vi att fĂ„ mĂ„nga fler anvĂ€ndabara kommandon som automatiserar och snabbar upp, ja… i princip all form av management.
För att fÄ de senaste s.k cmdlets som finns för Powershell 3.0 sÄ behöver du göra följande i din Windows 7 maskin, i Windows 8 sÄ finns redan Powershell 3.0, dock mÄste du tÀnka pÄ att din Windows 7 klient mÄste vara pÄ engelska.

HĂ€mta hem och installera .Net 4.0 framework
Starta om datorn och installera 
Windows Management Framework 3.0

Sedan för att kunna importera vissa moduler sĂ„ behöver du Ă€ven installera 
Windows ADK
Ett exempel pÄ kommando Àr att du fÄr fler vÀxlar för Dism, om du ska göra en s.k dualboot eller Windows to go osv, sÄ slipper man ImageX.
Sedan finns det möjlighet att schemalĂ€gga att powershell script körs och mĂ„nga fler cmdlets och funktioner.

HÀr finns ocksÄ en intressant artikel om WMI och powershell och hur Common Information Model (CIM) fungerar

Installera Mango (Windows Phone 7.5)

Nu vÀntar en del av oss pÄ Windows Phone 7.5 uppdateringen.
IstÀllet för att vÀnta (och om man inte har nÄgot bÀttre för sig) sÄ kan man forcera uppdateringen.
Det finns en blogg hÀr om detta http://www.winrumors.com/how-to-force-official-windows-phone-7-5-mango-update-onto-your-device/
Man startar Zune, ansluter mobilen, gÄr till Uppdatera och nÀr man ser att Zune söker efter en uppdatering sÄ drar man ur nÀtverkssladden. NÀr den hittar en uppdatering sÄ anslut nÀtverket igen, uppdatera telefonen, sedan ska du fÄ att en annan uppdatering finns tillgÀnglig. Om inte, repetera om frÄn början.
Se tidigare nÀmnd blogg för mer information.

Script (samt psexec) för att avinstallera applikationer remote

Remote uninstall Software.HTA anvĂ€nds för att “silent” avinstallera applikationer pĂ„ en fjĂ€rransluten dator utan att anvĂ€ndare mĂ€rker nĂ„got.

Man kör Remote Uninstall Software.HTA och sedan pekar man ut en dator.
NÀr man sedan klickar pÄ Silent vid en applikation sÄ sÀger den första gÄngen att man mÄste lÀgga PSEXEC i ett antal sökvÀgar.
Det Àr bara att kopiera in PsEXec.exe i de sökvÀgar som programmet hÀnvisar till. Sedan kan man avinstallerar applikationer pÄ en dator utan att anvÀndare mÀrker nÄgot.

Förklaring till scriptet och var det gÄr att hÀmta hem kostnadsfritt finns hÀr
http://community.spiceworks.com/scripts/show/915-remote-uninstall-software-hta?page=7&utm_campaign=resource&utm_medium=email&utm_source=swemail